


Table of contents


No headings in the article.
A chatbot is a computer program designed to simulate conversation with human users, especially over the internet. They provide quick responses, are always available, less error-prone, and can help reduce operational costs. Due to these benefits, chatbots have become popular among businesses, tech projects, and organizations. In this article, we will be discussing how to build a simple chatbot using Node.js and Socket.io.
Node.js is a strong JavaScript platform for building high-performance server-side applications. Socket.io is a well-liked library that enables real-time, two-way communication between server and client. Combined, they form a sturdy framework for creating chatbots that can handle multiple users and respond instantly.
Let's get started
Step 1: Initializing Node
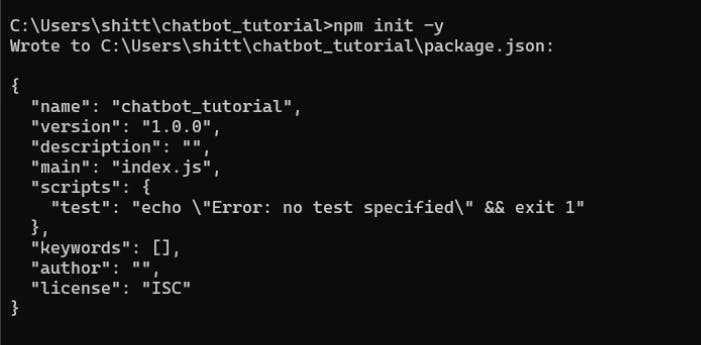
To build a Node.js project, we start by initializing Node.js in the project's root directory by running the npm init command. This will create a Node.js project, and the npm init command will create a 'package.json' file where all the modules we download will be stored.
Step 2: Installation Of Dependencies
Now that we have Node.js initialized in our project folder, we will have to install the following dependencies:
Express.js
Express-session
and Nodemon (this is a dev-dependency, so we'll install it separately)
To install the first three dependencies, run
npm install expresssocket.ioexpress-sessionTo install Nodemon, runnpm install nodemon --save-devWe are using Express.js to quickly and easily design and build the web application, Socket.io to enable real-time, two-way communication between the user and the server, Express-session to ensure that a device can only be connected at one time, and Nodemon to prevent us from having to restart the server every time we make changes.
Project Folder Structure:
  ├── package.json
  ├── package-lock.json
Step 3: Create The Server
Now that we have downloaded the necessary dependencies, it's time to create our server that will handle the chatbot's communication.
Create an "index.js" file in your project directory and add the following code:
// Description: This file is the entry point for the application

// Importing the required modules
const express = require("express");
const socketio = require("socket.io");

const path = require("path");

const http = require("http");
const session = require("express-session");

//creating an express app
const app = express();

//setting the public folder as the static folder
app.use(express.static(path.join(__dirname, "public")));

//session configuration
const sessionMiddleware = session({
    secret: "secret",
    resave: false,
    saveUninitialized: true,
    cookie: {
        secure: false,
        //set expiry time for session to 7 days
        maxAge: 1000 * 60 * 60 * 24 * 7,
    },
});

//creating a server
const server = http.createServer(app);
const io = socketio(server);

//using the session middleware
app.use(sessionMiddleware);
io.engine.use(sessionMiddleware);

//listening for user connection
io.on("connection", (socket) => {
    console.log("a user connected");
//More Code To Be Added Here
});

//starting the server
server.listen(3000, () => {
    console.log("listening on *:3000");
});
This code creates a new express app, sets the public folder as the static folder, configures our session, and initializes a new HTTP server using the express app. It also initializes a new socket.io instance and attaches it to the HTTP server. Finally, it listens for incoming connections on port 3000.
Run nodemon run index.js to start the server
Project Folder Structure:
├── index.js
├── node_modules
├── package.json
├── package-lock.json
Step 6: Create The Frontend
With the server running, it's time to create the front end of our chatbot to emit events and notify the server of connections. Create a new folder called public and create an index.html in your public folder and add the following code:
<!DOCTYPE html>
<html lang="en">
    <head>
        <meta charset="UTF-8" />
        <meta http-equiv="X-UA-Compatible" content="IE=edge" />
        <meta name="viewport" content="width=device-width, initial-scale=1.0" />
        <title>Chat</title>
        <link rel="stylesheet" href="css/style.css" />
    </head>
    <body>
    <h1>Chatbot</h1>
    <!-- Div To Display Our Messages -->
    <div id="messages"></div>

  <!--Form to submit message -->
    <form>
      <input id="message-input" type="text">
      <button type="submit">Send</button>
    </form>

    <!-- To Connect Socket.io -->
        <script src="/socket.io/socket.io.js"></script>
    <!--To Link To External JS -->
        <script src="./main.js"></script>
    </body>
</html>
This code creates an input form with a submit button and a div to display the user and bot messages. It also links to our Socket.io backend server and an external JS file in the same directory.
Project Folder Structure:
├── index.js
├── public
│   ├── index.html
├── node_modules
├── package.json
├── package-lock.json
Step 7: Establish The Connection With The Frontend
To link the frontend with the backend, we need to create a 'main.js' file in the 'public' folder and add the following code:
//connect to the socket
const socket = io();
//get the elements from the DOM
const messages = document.getElementById('messages');
const chatForm = document.getElementById("chat-form");

//listen for the chat message event from the server
socket.on("chat message", (message) => {
  //output the message to the DOM
  outputMessage(message);
});

//attach an event listener to the form
chatForm.addEventListener("submit", (e) => {
  //prevent the default behaviour
  e.preventDefault();
  //get the message from the input
  const message = e.target.elements["message-input"].value;
  //sends the message to the server
  socket.emit("chat message", message);
  //clear the input field
  e.target.elements.message.value = "";
  e.target.elements.message.focus();
});

//Output the message to the DOM
const outputMessage = (message) => {
  //create a div element
  const div = document.createElement("div");
  div.classList.add("message");
  //check if the message is from the bot or the user
  if(message.sender === "bot"){
  div.innerHTML = `bot message: ${message}`}
  else{
  div.innerHTML = `user message: ${message}`}
  //append the div to the messages div
  messages.appendChild(div);
}
This code listens for a 'chat message' event from the server and outputs the message. It also emits a 'chat message' event when we submit the form, which will be caught in the backend. Additionally, it has an output message function that appends the message to the messages div and adds the sender.
Project Folder Structure:
├── index.js
├── public
│   ├── main.js
│   ├── index.html
├── node_modules
├── package.json
├── package-lock.json
Step 8: Catch The Message In The Backend
Now that the front end is able to emit and display the response from the backend, we'll listen to the 'chat message' event in the backend and send appropriate responses. We should see "a user connected" log in the terminal
In this block of code from the index.js, we'll be writing more code and logic:
//listening for user connection
io.on("connection", (socket) => {
    console.log("a user connected");
});
Copy This Code Into The Code Block above:
io.on("connection", (socket) => {
    console.log("a user connected");
    //get the session id from the socket
    const session = socket.request.session;
    const sessionId = session.id;
    //the socket.id changes every time the user refreshes the page, so we use the session id to identify the user and create a room for them
    socket.join(sessionId);
  //welcome the user
  io.to(sessionId).emit("chat message", {sender: "bot", message: "Welcome to the chat app, say hello to the bot"});
  //a random variable to store the user's progress
  let progress = 0
  //listen for the chat message event from the client
  socket.on("chat message", (message) => {
    //output the user message to the DOM by emitting the chat message event to the client
    io.to(sessionId).emit("chat message", {sender: "user", message});
     //logic to check the user's progress
    switch(progress){
      case 0:
        //if the user replies, increase the progress and send the default message
        io.to(sessionId).emit("chat message", {sender: "bot", message:`Press any of the following keys: <br>
    1. Place Order <br>
    2. Checkout Order <br>
    3. Order History <br>
    4. Cancel Order <br>`});
        progress = 1;
        break;
      case 1:
        //the user has selected an option, so we check which option they selected
        let botresponse = "";
        if(message === "1"){
          botresponse = "You selected option 1 <br> here is the menu";
        }else if(message === "2"){
          botresponse = "You selected option 2 <br> checkout your order";
        }else if (message === "3"){
          botresponse = "You selected option 3 <br> here is your order history";
        }else if(message === "4"){
          botresponse = "You selected option 4 <br>order canceled";
        }else{
          //if the user enters an invalid option, we send the default message
          botresponse = "Invalid option <br> Press any of the following keys: <br> 1. Place Order <br> 2. Checkout Order <br> 3. Order History <br> 4. Cancel Order <br>";
//set the progess as 1 until the proper input is recieved
          progress = 1;
          io.to(sessionId).emit("chat message", {sender: "bot", message: botresponse});
          return
        }
        io.to(sessionId).emit("chat message", {sender: "bot", message: botresponse});
        //reset the progress
        progress = 0;
        break;
    }
  });
});
With these few but plenty lines of code, we've been able to create a simple chatbot, which works for one device at a time using Node.js and Socket.io! This is just a basic example, but it can be built upon and made more efficient and interesting. I hope it helped, thank you.
Clone the git repo, run npm install . and npm start dev .